


Years ago, when I first heard the term dulce de leche in America, it struck me as fancy and I didn’t quite know what it was. Candy made of milk, or sweet made of milk, as the translation goes. Hmm. Until I found out it was nothing more than what we called “cooked or boiled condensed milk” back in Azerbaijan, in fact, in all of the former Soviet Union republics.
You see, cooked condensed milk serves as the basis for the cream in many cakes and sweet pastries baked in the region. Slathered in-between cake layers just like that, or mixed with walnuts, or whipped with butter—cooked condensed milk, or dulce de leche, makes the most delicious of creams. You can also spoon it over ice cream, sandwich it in-between cookies, or eat by the spoonful (my favorite way!). Dulce de leche rocks. And we all deserve to indulge in it.

The good news is that it is super easy to make your own dulce de leche at home. All you need is a can of store-bought condensed milk. Well, yes, you can make your own condensed milk first, if you wish, then turn it into a dulce de leche. But why bother if you can buy a can of condensed milk from a store, then cook it, right in its own can! Isn’t it great? Let’s do it.
Stay tuned for the recipe for something absolutely amazing that has dulce de leche in it (you will need 2 cans for it). I’ll keep it a surprise for now.
Easy Homemade Dulce de Leche
Makes about 2 cups
Note: For most cake and pastry recipes, you will need more than 1 (typically, 2) can of dulce de leche. Use this recipe as a guideline and make as many cans of dulce de leche as you need. Cook the cans at the same time, making sure not to crowd them in the pot.
Ingredients
One 14-oz (397 g) can sweetened condensed milk (preferably organic)
Directions
Remove the label from the can. (If it is not easy to remove it because it is well glued onto the can, no worries, you can do it in the next steps, after a few minutes of boiling the can—the label will come off by itself, so carefully remove it from the pot with a spoon or a fork, whichever works for you.)
Place the can in a small pot and fill the pot with enough water to well cover the can. Bring to a boil over medium heat, then reduce the heat to medium-low and gently boil the can for 3 hours. Very important: The can should always be well covered with water, so as the water evaporates during the cooking, make sure to pour in additional boiling (!) water to the pot.
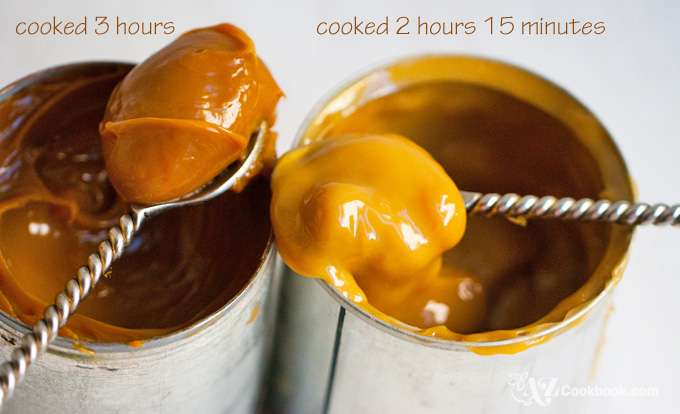
You can cook your condensed milk for less than 3 hours, depending on the consistency of dulce de leche you want to achieve for a particular recipe. Below is the photo that shows how the color and consistency of the condensed milk varies depending on the cooking time. The 3-hour dulce de leche will have a dark tan/caramel color and will be thicker.
When the time is up, carefully drain the pot, then remove the can from the pot with a kitchen mitten (not with your bare hands!) and put aside to cool to room temperature. Do not open the can while it is still hot! Otherwise, the milk will gush out and spill everywhere. Plus, it is hot and the can can explode! When completely cool, open the can, stir the dulce de leche, and use as directed in your recipe. Otherwise, remove from the can, pack into a jar, cover, and store in the refrigerator for up to 3 weeks.
Drooling here!